thank you counter button
Plugin has Statistics data table which shows posts list with total thanks quant for every post and time of the latest thank. Rows in the table can be filtered by posting month, category, can be sorted by thanks quant or time of latest thank in the descending or ascending order. Selected post can be viewed or edit directly from this table.
Admin dashboard and sidebar widgets with list of latest thanked or the largests thanked posts (between 3 and 15) are available. Total quant of thanks can be shown. Use widgets control panels to change settings according to your preferences.
The set of shortcodes and content filters is available for this plugin.
Thank You Counter Button has been granted the “Editor’s Pick Award” by FamousWhy.com  . .The latest version: -. Click the Download button below if you wish to try it. Quant of downloads: - 
|
 |
Quick Links
Installation procedure:
Attention! This plugin will work properly for that WordPress installation only which has “CREATE” permission on its MySQL database. “Create” permission is needed as plugin creates two own DB tables to work with.
1. Deactivate plugin if you have the previous version installed.
2. Extract “thanks-you-counter-button.1.x.x.zip” file archive content to the “/wp-content/plugins/thanks-you-counter-button” directory.
3. Activate “Thank You Counter Button” plugin via ‘Plugins’ menu in WordPress admin back-end.
4. Go to the “Settings”-“Thanks CB” menu item and check/change your preferences to customize how this plugin will work for you.
5. Use “Tools – TYCB Statistics” menu item to analyze how many thanks you get per post, who and from where left them.
6. Use “Appearance – Widgets” menu item to add “Thank You Counter Button” plugin’s widgets to your site.
Settings page
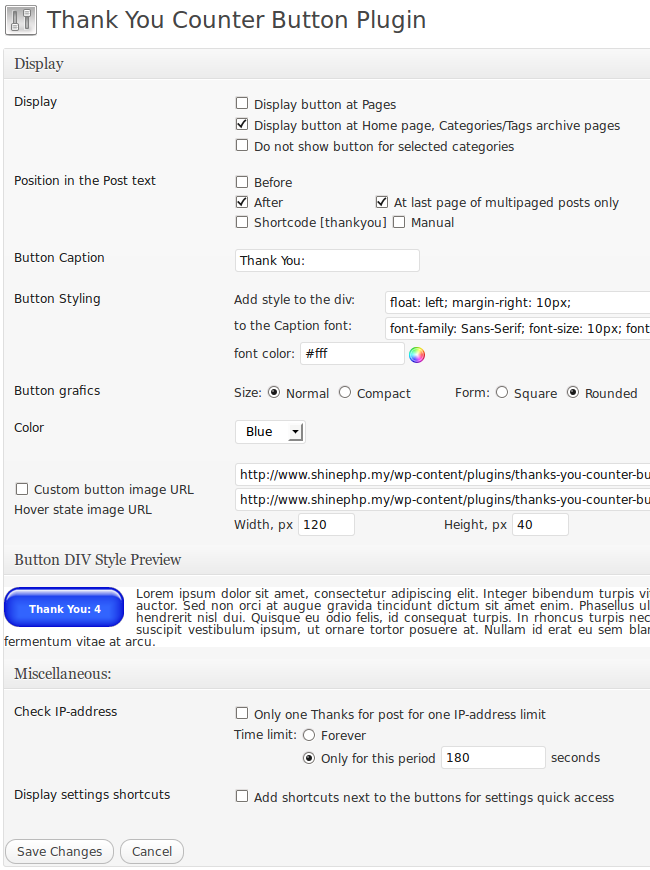
Thank You Counter Button Settings page
- Display –
Display button at Pages: if it is checked, then shows counter button at the WordPress Pages. If this checkbox is not checked then button is not shown on the Pages.
Display button at Home page: if this checkbox is checked then counter button is shown for every post at the Home page.
If both Display checkboxes is not checked then counter button is shown for the single post pages only.
Do not show button for selected categories: check this checbox and select in opened categories list categories for which you don’t want to show ‘Thank You’ Button. - Position in the Post text – these controls allow you to customize the place where click counter button to show in relation to the post content: before, after, shortcode and manual.
Before: Do you wish to place ‘Thank You’ button before post text? Check ‘Before’. Additional option ‘At first page of multipaged posts only’ will appear on the screen then. If you write multi-paged posts, you have the next variants: 1) show button at every page, 2) show button at the 1st page of multi-paged post only. That second checkbox to the right from ‘Before’ one serves for that purpose.
After: The same is valid for the ‘After’ checkbox with the difference only that second checkbox is ‘At last page of multipaged posts only’.
Shortcode [thankyou]: You can place it in any place inside the post content and you will see thanks counter button there.
Manual: This option allows to hard code counter button somewhere in your blog theme – place thanks_button() function call for that in one of your theme files. For example,<?php echo thanks_button('Thank You', true); ?>
thanks_button() function returns html code for the button as the string. How to use it (make echo or concatenate it with other content, etc.), it is your decision as the theme developer. You can to call thanks_button() inside the posts loop with second parameter set to false to use $post->ID for its work. It works inside of pages too. If second parameter set to true then you get global for the whole site thanks counter with ID=0.
- Button Caption – it is ‘Thank You’ by default. You can put you favorite words here, e.g. ‘I Like It’, etc. and it will show that text at the counter button.
- Button Styling –
Add style to div: put CSS code to align button properly (left, right or center). Save settings and see how it will be looked right here at the div style preview section at the bottom of the Settings page.

button div style preview
to the caption font: add CSS for the font family, size, weight selection. You can put font color manually into CSS input field or use the nice color picker, just click on the color circle icon. After you finish edit CSS code click anywhere on screen beyond CSS input field and you will see the visual change as the result of your input immediately. - Size –
Normalis 120 px width and 40 px height button,Compactis 100x26px button. Change in this option dynamically changes button images which are shown below. - Form and Color – You can select from the several predefined colors and forms variants for your blog thanks button. Select one which the most suitable for your theme colors.
- Custom button image URL – turn on this check box if you prefer to use your own button image. Input the full URL into correspondent text input field, input height and width for your button also.
- Check IP-address – If this checkbox is turned on then only one point can be added from the unique IP-address if additionally ‘forever’ time limit option is selected. If ‘Only for this period’ time limit option is selected than visitor from that IP can vote again after time in seconds you input will be elapsed.
If ‘Check IP-address’ checkbox is turned off then IP-address is not controled and visitor can click the button and raise its counter without any limits. - Add shortcuts to the buttons for settings quick access – if turned on (checked) shows three shortcuts links (icons) to the right from the “Thank You” button:
1) “Settings” – lead you to the “Settings page of the TYCB plugin”;
2) “View statistics details for the post” – shows table with last 35 IP-addresses from which visitors who clicked “Thank You” button came from. Every IP address is linked to the service page where you can see Country, Region and City of that IP (or any custom input IP) address;
3) “Hide this shorcuts” – hides shortcuts icons from the all visible “Thank You” buttons. In order show those shortcuts again you need to check (turn on) corresponding checkbox at the plugin Settings page
 ‘Return to Defaults’ button from the Misc section allows automatically return all options to its default values. ‘Reset Counters’ button allows to clear all counters for all posts with all click history together. Be carefull when press this button, you can lose the valuable data if you will act without care.
Statistics page
Click “Tools – TYCB Statistics” menu item to open “Thank You Counter Button” plugin Statistics page. There you can check how many thanks and when they were left by your blog visitors. Filtering by post dates, categories and sorting by thanks quant, date-time, paging are available. One click GEO IP (where your visitor from) service from shinephp.com is available at statistics details page.
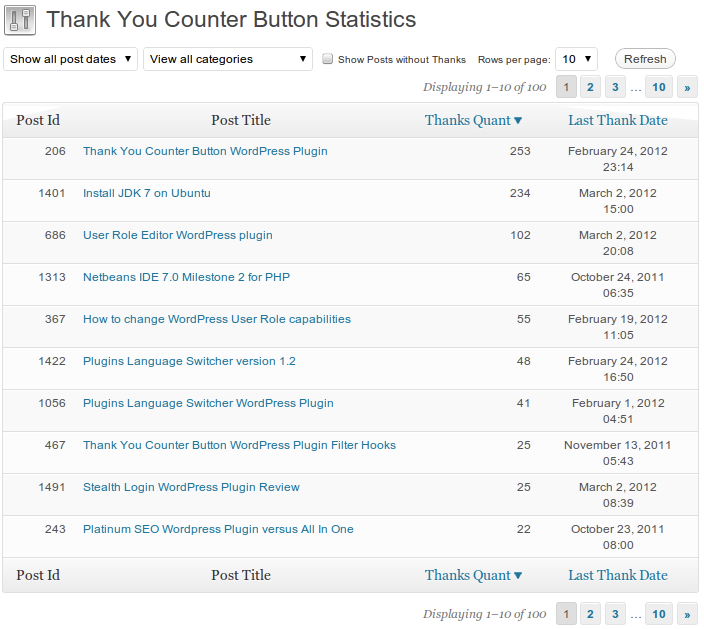
Thank You Counter Button Statistics page
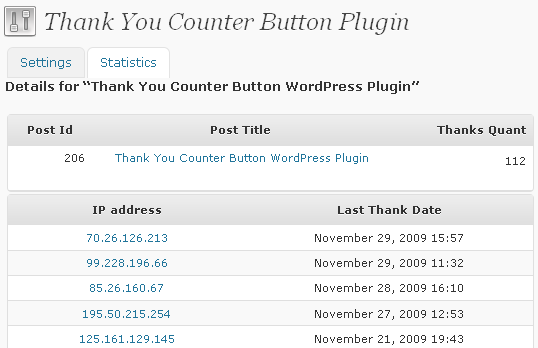
Post Detailed Stat
With click on the IP-address or the special link under it You can see, from which IP “thanks” for that post were left and from what country, region, city that IP came from.
Widgets
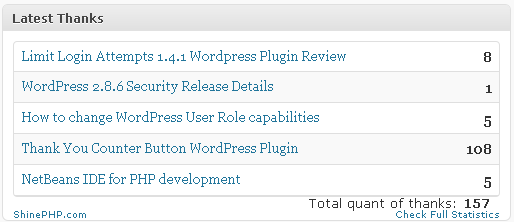
thank you counter button admin dashboard widget
With widgets you can see yourself (admin dashboard widget) and show to your blog visitors (look on the sidebar widgets to the right) current information about the most thanked or latest thanked post, including the total quant of thanks information.
Admin dashboard widget control panel can be opened by click on the “Configure” link at the right top corner of the widget title bar.
Sidebar widget can be configured via standard WordPress widget configuration panel at the widgets sidebar. Use own CSS (insert it into your theme style.css file) to customize widget appearance and make it more attractive. Available widget CSS classes (thanks_quant_for_post, thanks_total_quant_label, thanks_total_quant_value) are shown at the image below:
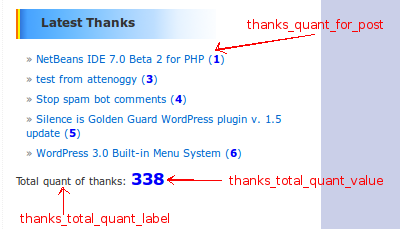
Thanks Widget CSS

It is continued on the next page
Pages: 1 2
Tags: wordpress plugin


